Well, like the name says, this is the bubble-skirted dress tutorial! I made this as a
Christmas dress for my youngest. The instructions are for a 12month dress, but could easily be tweaked for larger sizes. This is the first part in a two part series. Part 1 is all about the prep work.
I started with a store-bought shirt to make my life a little easier. I had a cute holiday owl patterned piece of fabric I bought at Hobby Lobby (I
couldn't pass it up!! It was
WAY too cute!!)
Necessary materials:
T-shirt in the right size
Fabric - the kind doesn't matter so much, but if you use a heavier fabric for the skirt top part you should use a lighter weight fabric for the under part of the skirt.
Ruler/tape measure
Scissors
Sewing machine
Thread
Glittery puffy paint (optional)
Pretty bow (optional)
I cut out several of the owls, and laid them out on the shirt to see which one would fit the best.
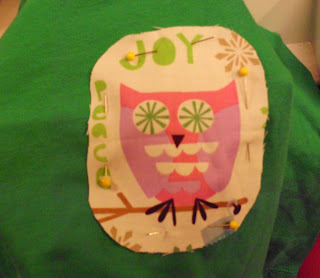 |
The little guy girl I decided on. |
I then took out the bottom hem of the shirt. You should do this from behind. I used a sharp snips scissor instead of one of my 7 or 8 seam rippers...For these shirts (Garanimals) it's the easiest thing to use. You just cut up the middle of the seam, and pull all the threads out.
Next cut off portion that was folded under and hemmed at the fold line.
Center and pin on the applique. And stitch away! I first did a single straight stitch near the edge, then went around 3 or 4 times along the edge with a zig-zag stitch I would have done more, or a satin stitch if I had planned on having the edge show...but I didn't. I didn't use any fusible webbing, but feel free to use it on yours! And if you want to have the edge show you could do a decorative or satin stitch around the edge.
After it is sewn down use glitter puffy paint around the edges to seal it down. Set it aside while it's drying and work on the rest. Unless you plan to sew all of it in one sitting....Then hold off on the puffy paint until you're done. It needs 4 hours to dry laying out on a flat surface.
I then cut out the top skirt fabric (the holiday owls) - I made it four times the length of the bottom of the shirt, plus 1/2 inch seam allowance. The width was 8 inches.
 |
| The owl fabric is folded in half lengthwise, so what you see is actually doubled. |
Then cut the bottom skirt fabric (the dark brown) to be 1.5 times the length of the bottom of the shirt, plus 1/2 inch seam allowance. The width was 7.5 inches. I made the under skirt fabric less wide so that the top skirt fabric would go up underneath a little.
 |
| This is the two fabrics in relation to each other. I ended up cutting the brown fabric down after the picture - I originally had the brown fabric 2x the width of the bottom of the shirt. |
Fold the fabric in half lengthwise with right sides together, and sew up the back seam. Do this with both pieces of fabric.
And that is it for Part 1, the Prep-Work! Part 2 has all the "hard stuff" in it.


I'll stay tuned for part two, and congratulations! You are one of the winners of my sewing pattern giveaway sponsored by Sew Mama Sew. Feel free to select any pattern from my shop; let me know which one you would like, and I'll email it to you.
ReplyDeleteHappy sewing!