Friday, December 31, 2010

Deal/Giveaway LOVE

I follow the blog Craftiness Is Not Optional, and she posted today about a great giveaway, and a fantastic deal. What's the giveaway and deal? PATTERNS!!! Dear My Kids easywear is giving away (through the blog giveaway) some patterns, but also doing a buy one get one free pattern sale for mentioning the CINCO blog. So, of course, I *HAD* to enter the giveaway.....and buy a pattern (and get one free!!).
I have my eye on all of the patterns, there are some specifically that I *really really really* want to get, and there are two that I just got!
I can't wait to make some cute stuff!! (I see some cute Valentines day things in the future....)

Sunday, December 26, 2010

Store Front!!

I've been working on setting up an eCrater store front. I keep getting told I need to sell my creations...soo here goes....hopefully something! Check it out!!
I'm not done setting it up, but I wanted to get some things listed. Let me know what you think I should add to the store! My goal is to add two new things every week. We'll see how that goes!!

Monday, December 20, 2010

Stuffed Owl Pillow

I've been making things for Christmas presents left and right. Mostly clothing. A painting. A few crafts. I needed something different. Something I haven't made before. And then one of my favorite bloggers, Ashley at Make It and Love It, posted about a pattern she made for Bernina's Sewing Republic. I thought this would be great fun to make, but didn't really have anyone left to make it for. (I'm sure I could come up with someone...but thankfully I didn't have to!) Puppy Girl saw me looking at the Bernina site and said "OH! I have a friend that would like that! Can you please make it, mommy!!?" Why yes my darling child, I can! haha!
So I printed off the pattern piece pages, and then copied them at 75%, and again at 50% the original size. This way I have three options to choose from. And hoo who knows?! One day I might make a little owl family for someone.
I have to admit that I didn't read any of the directions. I know...I should read pattern directions. Buuuuutttt..... *shrug* It wasn't all that hard to figure out! I made a slight alteration. Instead of sewing down the wing panels I made wings that can come off the body. This was also at the request of Puppy Girl. I really love the way the whole thing turned out.
I used the middle sized owl pattern (75% of the original size) and random scraps that all had one thing in common - blue. The girl I was making this for has a favorite color - can you guess what it is?!
Crazy-eyed owl!
I also deviated from the pattern in the eye placement, and what the black part in the middle of the eye is made of. In this case it's black sparkly puffy paint instead of fabric. I used scrap strips of "liquid metal" fabric to go around the outside of the wings. I quilted the two sides of the wings together with a piece of batting in the middle. I followed the square pattern on one side of the wing to do the quilting.
The inside of one of the wings. And you can see the fabric really well on the bodice in this picture.
You can see the quilting from this angle - I used purple thread for the quilting since the outside wing fabric has purple in it. The bodice piece and the inside of the wings is from a bandanna from the dollar store - 2 for $1! YAY!
View of the other inside wing.
The owl back.
For the front and back of the owl base I used one of Hubby Babe's old button-up shirts. It had a hole in it that couldn't be fixed - so I confiscated it! I used the breast pocket area for the back of the owl. How fun will it be for the little girl to put things in it!? I used to stick things in my Popple's pouch....I loved that thing! ... Please tell me you remember Popples.
For the back I used the "correct" side of the shirt so the pocket could be used. But for the front I used the "inside" of the shirt. I thought it looked neater on the inside than on the outside! For the rest of the bits I used scraps from other projects.
Note on time: It took roughly 2 hours to make, including the quilting for the wings.

Saturday, December 18, 2010

Bubble-skirted Dress Part 2 - "Hard"-Work

Welcome to Part 2 of the bubble-skirted dress tutorial! This one is going to be just as loaded with pictures as Part 1...Or maybe even more pictures. If you need any clarification on anything, feel free to comment or email me!
So, in Part 1, we got the shirt prepared, and the skirt material ready...now it's time to really start sewing!
Put a pin in all four "corners" of the fabric on each end.  Sorry, I didn't take a picture of this step. Basically, you hold the back seam in one hand, and lay the fabric smooth to find the exact middle of the front. You put a pin there. Then you line up the front pin with the back seam to find the two exact sides. Put a pin in each side. Do this to the top and bottom of both pieces of fabric.
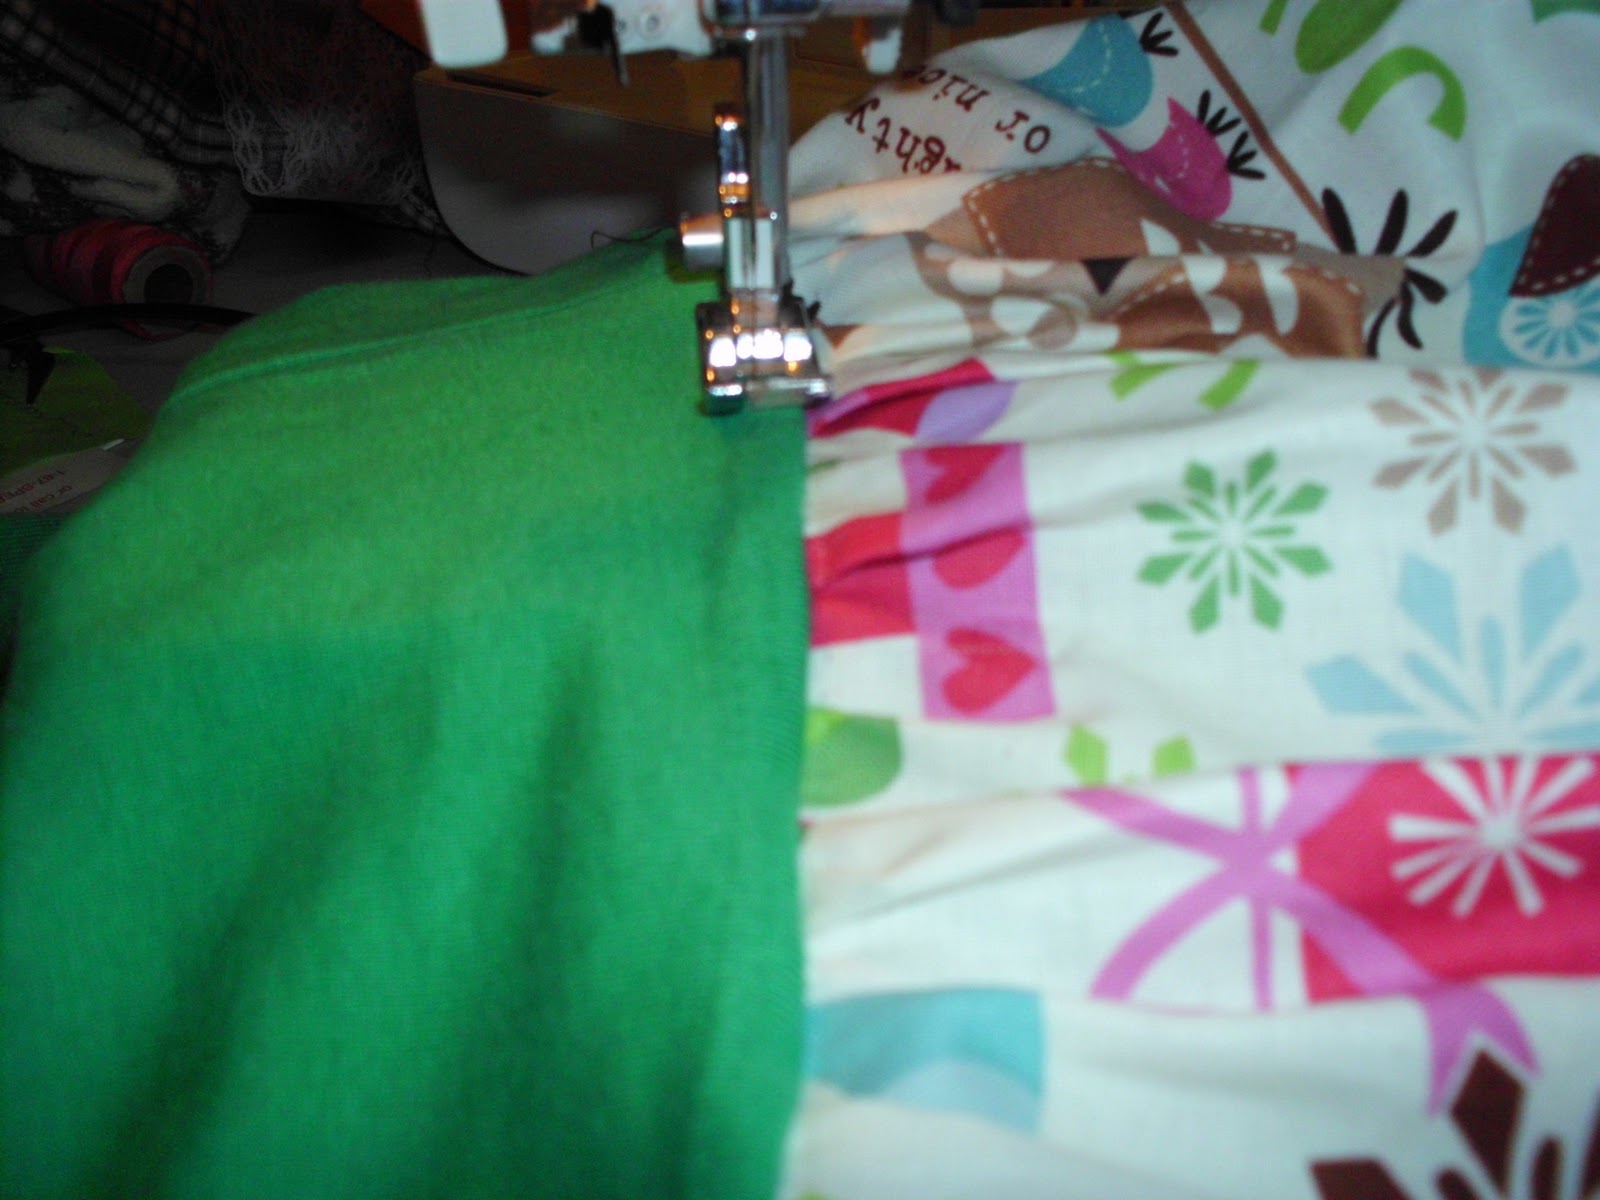
Put your machine onto the longest straight stitch setting, and the tension knob to the highest number to gather. Stitch as close to the edge of what will be the bottom of the top skirt as you can. The closer to the edge you are the easier it is to hide the stitching in the seam if you don't end up being able to pull all the stitching out later. (There will be more clarification later!)
The process of stitching starts the gathering.
Make sure to leave a nice sized tail of thread when you remove the fabric from the machine (side note - if I know the gathering seam isn't going to be seen I like to use a contrasting thread color - makes it easier to see when gathering!). After it is gathered, line up the pins (that you kept in while sewing!!) of the top fabric, with those of the under fabric. Make sure you have the right sides of the fabric together. Pin the two pieces together at the four "corners" and pull the strings to gather the fabric more if needed.
Match up the pins.
See the non-gathered area? That's why you leave the strings - so you can pull them and gather it up more as needed!
The top skirt fabric is all gathered and the bottom skirt fabric is flat.
Sew the top and under fabrics together. I used my (super fantastic) serger to sew the two layers together, but you can do a straight stitch on the inside, and a zig-zag stitch closer to the edge.
After they are sewn together, when you pull them apart it would look like you were making a tiered skirt.
Notice that the owls look upside down. The top of the brown is at the top of the picture, while the top of the owls is at the bottom of the picture since the brown goes inside the owls. I hope that made sense!
A close up. The brown is the under skirt and is still nice and flat, while the owls is the top layer and is all gathered.
Do a top stitch on the under skirt to hold the seam down. This step is optional, but I think it makes the skirt lay a little more nicely once the whole thing is done.

The next step can be done a couple different ways. For either way, you need to make sure you still have the four corners pinned on both the top and under skirt layers.
For the first option of how to do this step: Gather the top of the top skirt the same way that you did the bottom of the top skirt. Then pin it to the bottom layer at the four corners, tighten up the gathering until there is no slack between the two, and pin the layers together, keeping the four corner pins in and adding more pins to it to keep the gathered layer and bottom layer together. Stitch the two layers together, keeping the four corner pins in. After the two layers are stitched together, do a gathering stitch to make both layers gather up. (Still keeping the four corner pins in.)
For the second option of how to do this step (and the option that I went with): Put a pin in each of the mid points between the pins marking the four corners in both layers. Pin the two layers together matching up all of the pins together - There should now be 8 pins holding your two pieces of fabric together. Put the fabric in the machine with the gathering stitch on, and scrunch the top layer fabric in the space between the needle placement and the next pin as you feed it through the machine. Both of the layers will be gathered at the same time this way. And if you have some experience with gathering, and feeding hand-scrunched fabric in the machine, this way seems to take a bit less time.

Mark the mid points of the front and back of the shirt with pins. Then mark the points in between those points. Line up the skirt and shirt to see how cute it will be....and to check the gathering spacing.
Turn the skirt inside out and pin the skirt and the shirt together. Make sure you pin the middle back of the shirt to the middle back of the skirt, and middle front of the shirt to the middle front of the skirt. It's surprising how many times I've pinned bodice and skirt pieces together wrong. Or maybe not so surprising since I have two kids and a husband, and a dog and a cat, that all like to have my attention when I'm trying to sew!
Notice that you can see the owl fabric coming out from under the brown? That's because the brown was made to 7.5 inches, while the owl was 8 inches - remember?
Sew the skirt and t-shirt sandwich together. Again, I used my (beloved) serger, but if you don't have one, sew a straight stitch about 1/2 inch in from the edge, then a zig-zag closer to the edge (this is to lock in the potentially scraggly edges of the fabric). If you do a zig-zag stitch you might want to go around a couple of times, not just once.

Turn the dress right side out and take out all of the gathering stitches if you can see them. (This is why I like to do them in a contrasting color.)
Do a top stitch to hold down the skirt and t-shirt sandwich seam to the t-shirt.

If you decided to do all of the sewing before the glittery puffy paint seal, then do the glittery puffy paint outlining now!
Add the pretty bow to wherever you want (I played around with putting it in several different places. I had SUCH a hard time deciding!!)..and try on your cutie patootie!

Bunny Baby wearing her new dress and playing with the hologram costume-fabric cut offs.
I just love the way it turned out!! I hope you like yours just as much as I do. I'll be making a few more of these in other non-themed fabrics for year-round wear. But, let's face it - I'll probably have Baby Bunny wear this well after Christmas is over because it's so stinkin cute!
Note on sizing:
I would adjust the "width" of the fabric you cut (which becomes length once it's in dress form) by 1/2 - 1 inch up (with BOTH pieces of fabric!!) with the higher up in sizes you go, but continue to do about 4x the width of the bottom of the shirt for the "length" (which becomes width once it's sewn into dress form).
If sizing down in size I would adjust the "width" of the fabric by about 2 inches, and cut off the entire hemmed area of the shirt (instead of taking out the seam and just cutting off the folded area). Since smaller babies likely aren't walking yet it would probably get caught up when they are crawling around. With the 12 month sizing Baby Bunny gets a little tangled in it, but she's also on the verge of walking, so I didn't want to make it any shorter.
You could also fairly easily convert a onsie into one of these. I can make a tutorial on that too if I get enough requests....Or if I have a reason to turn a plain onsie into a cute bubble skirt dress!
Note on timing:
I made this in two nap times + Baby Bunny and Puppy Girl showering together. I'm not entirely sure how much actual time that was since Baby Bunny doesn't take consistently timed naps. But they are typically between 1 and 2.5 hours. Also, since this was the first one ever, it took a little longer. The next one(s) I make will take MUCH less time since I've already figured out how long/wide to cut the fabric, and figured out the best way to do the construction. (Much to your benefit!)
If you have any questions, don't hesitate to leave a comment, or email me.

Friday, December 17, 2010

Bubble-skirted Dress Part 1 - Prep-Work

Well, like the name says, this is the bubble-skirted dress tutorial! I made this as a Christmas dress for my youngest. The instructions are for a 12month dress, but could easily be tweaked for larger sizes. This is the first part in a two part series. Part 1 is all about the prep work.
I started with a store-bought shirt to make my life a little easier. I had a cute holiday owl patterned piece of fabric I bought at Hobby Lobby (I couldn't pass it up!! It was WAY too cute!!)
Necessary materials:
T-shirt in the right size
Fabric - the kind doesn't matter so much, but if you use a heavier fabric for the skirt top part you should use a lighter weight fabric for the under part of the skirt.
Ruler/tape measure
Scissors
Sewing machine
Thread
Glittery puffy paint (optional)
Pretty bow (optional)

I cut out several of the owls, and laid them out on the shirt to see which one would fit the best.
The little guy girl I decided on.
I then took out the bottom hem of the shirt. You should do this from behind. I used a sharp snips scissor instead of one of my 7 or 8 seam rippers...For these shirts (Garanimals) it's the easiest thing to use. You just cut up the middle of the seam, and pull all the threads out.
Next cut off portion that was folded under and hemmed at the fold line.
Center and pin on the applique. And stitch away! I first did a single straight stitch near the edge, then went around 3 or 4 times along the edge with a zig-zag stitch I would have done more, or a satin stitch if I had planned on having the edge show...but I didn't. I didn't use any fusible webbing, but feel free to use it on yours! And if you want to have the edge show you could do a decorative or satin stitch around the edge.


After it is sewn down use glitter puffy paint around the edges to seal it down. Set it aside while it's drying and work on the rest. Unless you plan to sew all of it in one sitting....Then hold off on the puffy paint until you're done. It needs 4 hours to dry laying out on a flat surface.
I then cut out the top skirt fabric (the holiday owls) - I made it four times the length of the bottom of the shirt, plus 1/2 inch seam allowance. The width was 8 inches.
The owl fabric is folded in half lengthwise, so what you see is actually doubled.
Then cut the bottom skirt fabric (the dark brown) to be 1.5 times the length of the bottom of the shirt, plus 1/2 inch seam allowance. The width was 7.5 inches. I made the under skirt fabric less wide so that the top skirt fabric would go up underneath a little.
This is the two fabrics in relation to each other. I ended up cutting the brown fabric down after the picture - I originally had the brown fabric 2x the width of the bottom of the shirt.
Fold the fabric in half lengthwise with right sides together, and sew up the back seam. Do this with both pieces of fabric.
And that is it for Part 1, the Prep-Work! Part 2 has all the "hard stuff" in it.

Tuesday, December 14, 2010

Versatility and Longevity

I came up with the idea, and design for this skirt last night...and then had to make it right then. Then I thought of other things I could do to make it even MORE versatile! Yikes! My brain seems to be in overdrive now that the semester is over!!
This is the Reversible Longevity Bubble Skirt
On one side we have this slightly vintage fabric:
And if you turn it inside out, on the other side we have a more modern fabric:
Two totally different looks, in one fantastic skirt!
The waistband can be folded over to make it shorter, then unfolded to make it longer - which means that it can last MUCH longer than any other skirt. The bottom stretches so that it doesn't impede playing, crawling, walking, running, climbing, or any other thing a little girl might do! Wear it year around - either with just a shirt, or add some leggings or tights and it can be worn in cooler weather too.
I have an idea to make it even MORE versatile...but I think that should be saved for another day - after I make a couple more and perfect how to do the stuff my brain is saying can happen with it. I was just too excited to NOT share this!
P.S. This skirt could fit the same little girl from 9 months all the way up to 2 years - depending on the size of the girl! Awesome, right!?

Sunday, December 12, 2010

Baby Bunny's Christmas Dress

Soooooo I made Baby Bunny's Christmas dress today. I couldn't be happier with how it turned out! I'm going to be posting a tutorial for how to make it. It will be a very detailed tutorial with lots and lots of pictures. Should I make this a one part tutorial? A two part tutorial? A sew-along? I'm not too sure. I'll figure it out and post it in the next few days! Until then...Here's what it looks like!


And, because my posting wouldn't be complete without showing Bunny in her new dress, I have these to show!
This is the face she's been making lately.

I'm trying to get her to stand - so of course she decides to sit!

Digging in her Oma's purse. Silly Bunny! Just because you're turned around doesn't mean you're being sneaky!

Digging through the sewing room garbage - Look at the PRETTY SPARKLES!!
Tutorial to follow very soon!

Saturday, December 11, 2010

Previously Made Costumes

This is just a little showing of some costumes I've made in the past (and that I actually have pictures of).
I had the straps safety pinned for sizing and to see if the design is how I wanted it.
I love polka dots!!
Halloween costume last year. You can see the sleeves in this picture pretty well.
You can see the colors better in this picture.
My mom made mine (I'm in the middle) and I made the two girls' dresses. This is a few years ago...and was taken RIGHT AFTER I had finished skating - so I look like a mess.
A couple details that are hard to see in the picture above: There is a flower on each girl's chest that I had to sequin myself - a TON of work; and the sequined fabric is actually a red mesh with sequins sewn on and dangling off over top of a bright orange shiny fabric that when put together looked like the same burnt orange as the velvet - at least in person. The flash of the camera made it look different.
I hope you enjoyed looking at them!!