(Quick warning - This post is a tutorial and it is
FULL of pictures and somewhat long.)
I'm coming up on the end of what has been a very very long semester. (For those of you that don't know, I'm graduating with my AA in April, and then after that it's nursing school! BSN here I come!!) And I'm in
dire need of a break. A real break. I'm burned out. ACK! I'm thinking I'm going to not only take the summer off after I graduate, but the fall too; I'll apply to the Jan. starting nursing school. But I'm completely off the topic I came here to write about.
Like I said, I'm coming up on the end of a long semester. And Christmas is quickly approaching. These two things are both very good, but mean that I'm super busy. And, of course, I'm addicted to reading what my favorite bloggers are doing, and coming up with all kinds of new ideas that I want to implement. *
sigh* I need more hours in my days, and more days in my weeks!
OK, back to the reason I'm writing! (I really can focus, I swear!!) I saw this
site, and thought it would be really fun to try out. Although, I know it could be a disaster. I mean... Me? I'm clumsy. Creative, yes. Graceful, yes. But also clumsy. Using a shirt and making something that actually looks cool using bleach might be a little too much for my butterfingers to handle. But it just looks so
fun. So I had to try it!!
Add to that the freezer paper stenciling I keep seeing. On more blogs than I'm willing to link to, so I'll just link to the
place I saw it originally. Then there's the reverse freezer paper stenciling.
Oh the options and ideas!!
So I wanted to combine all of these in my own unique way.
I started out with a brand new shirt. I figured this would give me the best color differences, and since the shirt would not have been worn already, if I screwed up I wouldn't do too bad of a job with the bleach/water mixture and weaken the fabric to the point of holes. Hopefully.
I sketched out what I wanted to put on the shirt. In this case I drew directly on the freezer paper on the paper side. I used this
two pictures I found online as inspiration. (I used google image search and the keywords bird in a tree, then clicked the "cartoon birds in a tree" option.)
 |
| Sloppy sketch. |
Then I very carefully cut out the image. I just used a pair of kids scissors. You could use regular scissors or an exacto knife or razor blade, or whatever you think would be best for your project. Since I decided to use the tree itself for a reverse stencil type thing, it didn't matter that I cut out out like that. But for a regular stencil I would probably use an exacto knife. (Or cut into the center and cut away what is not needed.)
Then I had to iron it on the shirt.
Once the stencil is ironed on the shirt (or whatever you're putting it on), it can be set aside.
 |
| I added two branch "perches" for later additions. |
The next step is to mix up the bleach and water and put it in a squirt bottle. I used 1:1 bleach to water. In retrospect, I think I would use a 70% 30% solution next time - 70% water to 30% bleach. You'll see why in a minute. So, mix up the bleach and water and put it into a squirt bottle. I bought a super cheap (97 cents at Walmart) squirt bottle to use. Great price, but I should have figured out exactly how well it works
BEFORE filling it with bleach and aiming it at the shirt.
Then I put some butchers paper inside the t-shirt, placed it in the tub, and aimed my squirt bottle at it. I was planning on taking a picture of this, but..well...things happened very fast from here!
(Back to the I should have figured out how well the squirt bottle works before doing this experiment.) I apparently opened the squirt nozzle too much and had it doing a strong precise streaming aim, instead of a misting aim.
OOPS! I wanted, and needed, a mist. So while I was figuring out how to fix this problem I had bleach water soaking into parts of the shirt, and, unfortunately, soaking the freezer paper as well. I had to work quickly to figure out that the tighter the nozzle is screwed on, the more misty the squirting is. Lesson learned for next time! So, I finished squirting the area I wanted bleached, and the paper was soaked in the process, and was left to soak for too long (thanks to not knowing what I was doing). Like I said earlier, I would do a 70/30 solution next time instead. I think I would have better control over the bleaching process that way.
So, yeah.
VERY fast is how this all happened. Before I knew it I had to rinse the shirt or risk not having a shirt left. NO time for pictures here. I'll hopefully get one next time I try this.
Unfortunately the bleach being so strong, and me not knowing what I was doing, meant that the shirt did not turn out how I had planned. However, I think it still looks pretty neat. After thoroughly rinsing the shirt in the tub I threw it in the washer (with some other stuff that needed to get washed anyway...I don't have time to do one shirt at a time in the wash!) and only used laundry detergent - no fabric softener. Since I'm not done with the shirt yet, I don't want to put anything into the fabric that might thwart paint adhering.
No picture for the washing and drying steps since looking at my washer and dryer is the last thing
I want to do, so I'm sure you don't care to see it.
While the laundry is going I sketched up two birds ("love birds") to use as freezer paper stencils. This time not caring about the birds that gets cut out, only the part that they get cut out of.
 |
| See the light lines around/under the birds? That's where I lightly sketched where the tree branches are to know exactly where to place the birds. |
Here's what the shirt looks like all clean and dry now.
 |
| See the speckles on the sleeves? Yes, that WAS on purpose. Same with the inside of the neck/back (which you can see from the other side too of course.) |
Then time to iron again! (Let's all shout for joy.."yaaaaay")
 |
| I did not cut out where the beaks are on purpose. I'm going to do something else for those. |
I used glittery "puffy" fabric paints instead of fabric paint pens. Why? Because I want the birds to kind of... stand out. Not be flush to the shirt. I painted one with a mixture of plain magenta and purple sparkles, and the other with a mixture of blue and green sparkles.
I decided to outline the entire heart tree with a permanent marker. I used a brown one, but it looks more like black (in the picture, and in person). Since I no longer had the stencil (it fell apart when I rinsed the shirt in the tub) I had to rely on my memory of what I drew, and the faint lines I could see. I also had to change it a little here and there from the original to make up for the changes that happened in the bleaching process.
For the feet I used a permanent fine point black marker.
For the beak I did some hand stitching. I don't really know how to explain what I did since it was basically free-form/free-hand with no real plan.
 |
| Stitching the beak with variegated yellow/orange thread. |
 |
| Beak on the left slightly open (the "girl" is talking), while the one on the right is closed (the "boy" is listening...hahahaha) |
For the eyes I used a super fine tipped permanent marker for each one. I know, not exciting. I might add a bead or rhinestone later. We'll see.
Here's a couple pictures of the completed shirt.
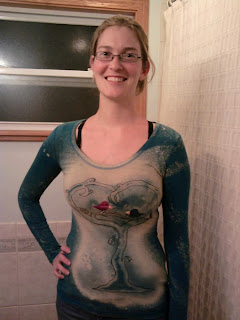 |
| Please don't mind my bra straps. I was too excited about the shirt being done and wanting to post this to care at the moment! |
 |
| A close-up of the finished product. |
See how the sleeves hit the top of my hand? Yeah...I'd
JUST pulled them down. They aren't really long enough. Neither is the body. I have this problem constantly with shirts because of my height (5'11"). I'll likely add some kind of fabric to the bottom of the sleeves and the bottom of the body to make them longer. But that will wait for some other day. And be a separate tutorial of it's own.
I'm sorry this one was so long! There were several steps involved, though. And, to my defense, the shirt was
NOT hard to do at ALL. The longest parts: deciding what I was going to do, waiting for the shirt to go through the washer and dryer, and waiting for the paint to dry. If I had already had a clear idea of what to do, or could/did print up my design on the paper instead of having to sketch it by hand, and if I take out washing/drying and paint drying time it probably took an entire 1.5 hours to do. The next one I do will be WAY faster, and probably (hopefully) look better. But I like it a lot! I'll be wearing it every chance I get, I'm sure! :-D